Follow these directions to install the PaperCut Client and Printers on personal Mac computers
Mapping a printer on Mac requires many steps, you may want to use Webprint (requires Yale Network or VPN), find a Windows PC to print from, or schedule a time with Digital Technology
Installing the PaperCut Client on MacOS
- Connect to the Yale Network (Yale Secure, Yale Wired, Yale Wireless or VPN)
- Download and install the PaperCut Client for Mac
- Find the downloaded file and run the installer
- You may be prompted that “Apple cannot check it for malicious software” and to open or run the installer anyways
- Run/open the installer and continue until completed
- Input your NetID and password when prompted
- The PaperCut Balance window should show on the screen
- The PaperCut icon should show in the menu bar
- The PaperCut Client must be running to print to DGSD printers
- See directions below on Installing the Networked Printers
Please visit YPPS BluePrint for more information
Installing the Printers on Mac
- Find Printers & Scanners in the system settings, or use the Spotlight/magnifying glass to search for “Printers and Scanners”
- Click “Add Printer” or the “+” symbol to add a printer
- Find the “Advanced” button or the Advanced Icon (two gears)
![]()
- If the Advanced button is not visible, you will need to customize your toolbar to add it
- Right click (or control left click) in the blank area next to the other icons, and select “Customize Toolbar”
- Drag the Advanced icon to your toolbar
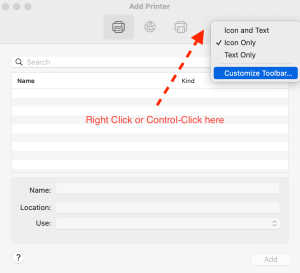
- Click the Advanced icon, you may need to wait a minute before the settings appear
Add the printer
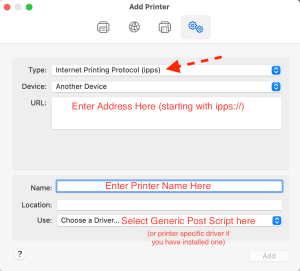
- Printer Locations
- We recommend you add YSD_Global_Print
- Type: Internet Printing Protocol (ipps)
- Device: Another Device
- URL: ipps://paperc-prd-ps2.its.yale.edu:9164/printers/YSD_Global_Print
- Name: YSD_Global_Print
- Use: Generic PostScript Printer or desired model-specific driver
- Click Add
- Check the ‘Duplex Printing Unit’ box for the Generic Postscript driver (or other desired features related to your model)
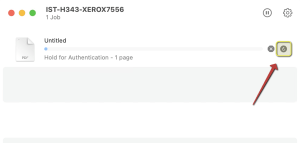
First print/enter NetID credentials
- Anytime a papercut printer is added to your Mac, the first print will be “held for authentication”
- Open the printer queue, you will see your print job, click the circular arrow icon

- You will be prompted to login, use yale\NetID and your netid password, remember to check “Remember this password in my keychain”
Release your print at the copier using your Yale ID
| Printer ipps Address | Model | Location | Capabilities |
| ipps://paperc-prd-ps2.its.yale.edu:9164/printers/YSD_GLOBAL_PRINT | Generic Postscript | All DGSD printers | Depends where print is released |
| ipps://paperc-prd-ps2.its.yale.edu:9164/printers/YSD_1156_GREENROOM | Ricoh SPC242DN-RIC | 1156 Chapel St/Basement-Green Room | Color Printer |
| ipps://paperc-prd-ps2.its.yale.edu:9164/printers/YSD_149_1stFloor | Ricoh Pro C5100s | 149 York St/1st Fl/Near Restrooms | Color Copier |
| ipps://paperc-prd-ps2.its.yale.edu:9164/printers/YSD_149_COLOR | Ricoh MPC6503SP | 149 York St/2nd Fl/Near Restrooms | Color Copier |
| ipps://paperc-prd-ps2.its.yale.edu:9164/printers/YSD_205_ROBLAB | Ricoh MP6503SP | 205 Park St/Robertson Lab | B/W Copier |
| ipps://paperc-prd-ps2.its.yale.edu:9164/printers/YSD_212_DRAMATURGY | Ricoh MP301SPF | 212 York St/Room 007/Basement | B/W Copier |
| ipps://paperc-prd-ps2.its.yale.edu:9164/printers/YSD_217_2NDFLOOR | Ricoh MPC3004EX | 217 Park St/2nd Fl/Outside Directors Seminar | Color Copier |
| ipps://paperc-prd-ps2.its.yale.edu:9164/printers/YSD_222_COLOR | Ricoh MPC6503 | 222 York St 2nd FL/Production Hallway | Color Copier |
| ipps://paperc-prd-ps2.its.yale.edu:9164/printers/YSD_222_WFPLOTTER | Ricoh MPCW22O1 | 222 York St Basement | Color Plotter |
| ipps://paperc-prd-ps2.its.yale.edu:9164/printers/YSD_222_AMD_3FL | Ricoh MP4055SP | 222 York St/3rd Fl Copy Room | B/W Copier |
| ipps://paperc-prd-ps2.its.yale.edu:9164/printers/YSD_222_B1 | Ricoh IMC3500 | 222 York St/Basement | Color Copier |
| ipps://paperc-prd-ps2.its.yale.edu:9164/printers/YSD_305_RM210 | Ricoh MPC4503 | 305 Crown St/Drama Rm210/2nd Fl | Color Copier |